Hello World
本教程将演示如何使Dapr在您的计算机上本地运行。
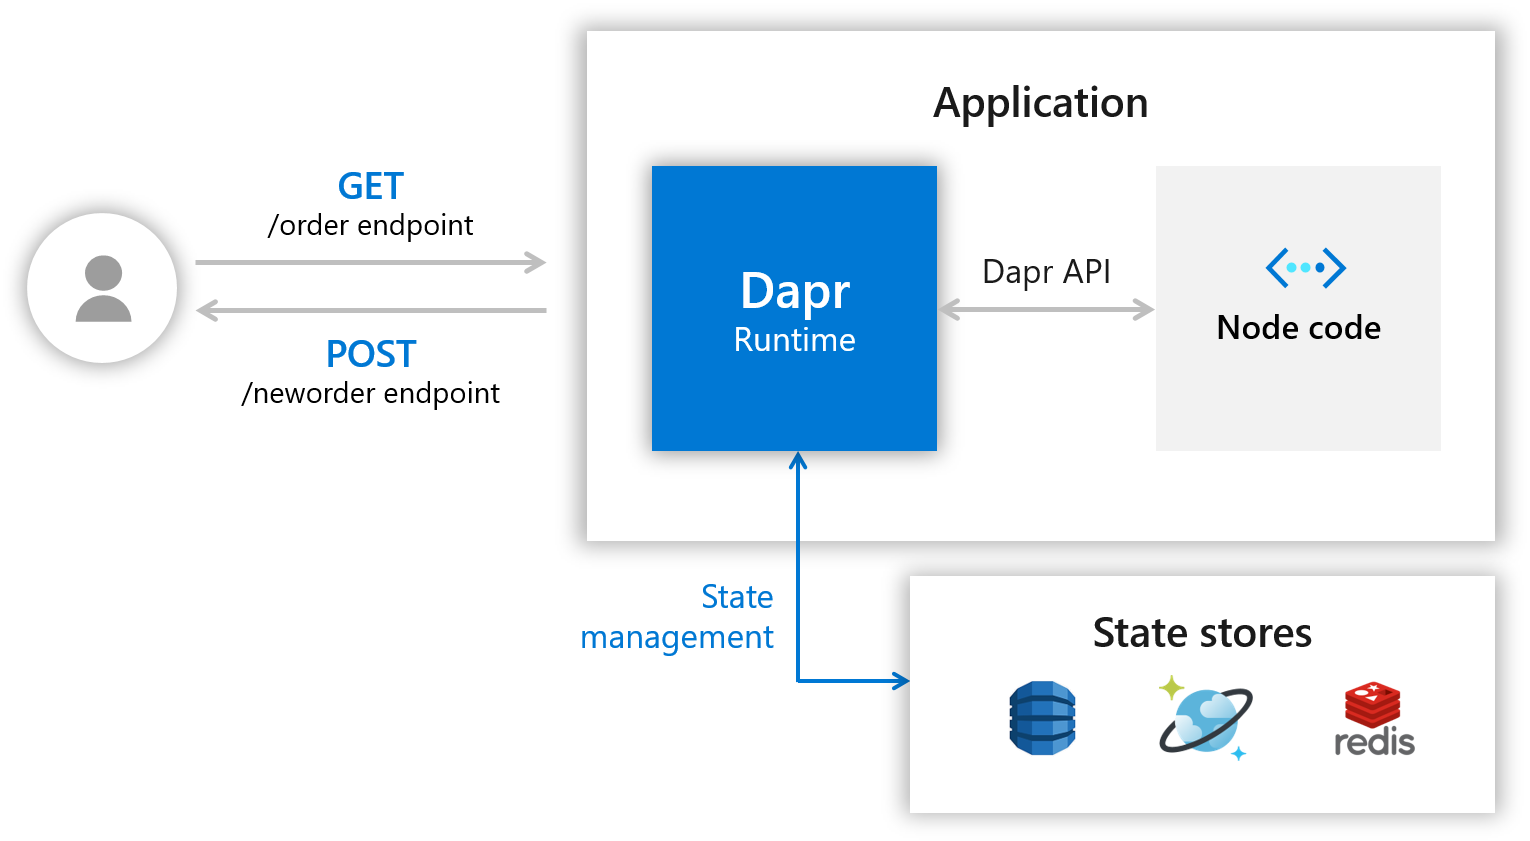
您将部署一个Node.js应用程序,该应用程序订阅订购消息并保留它们。
以下架构图说明了组成第一部分样本的组件:
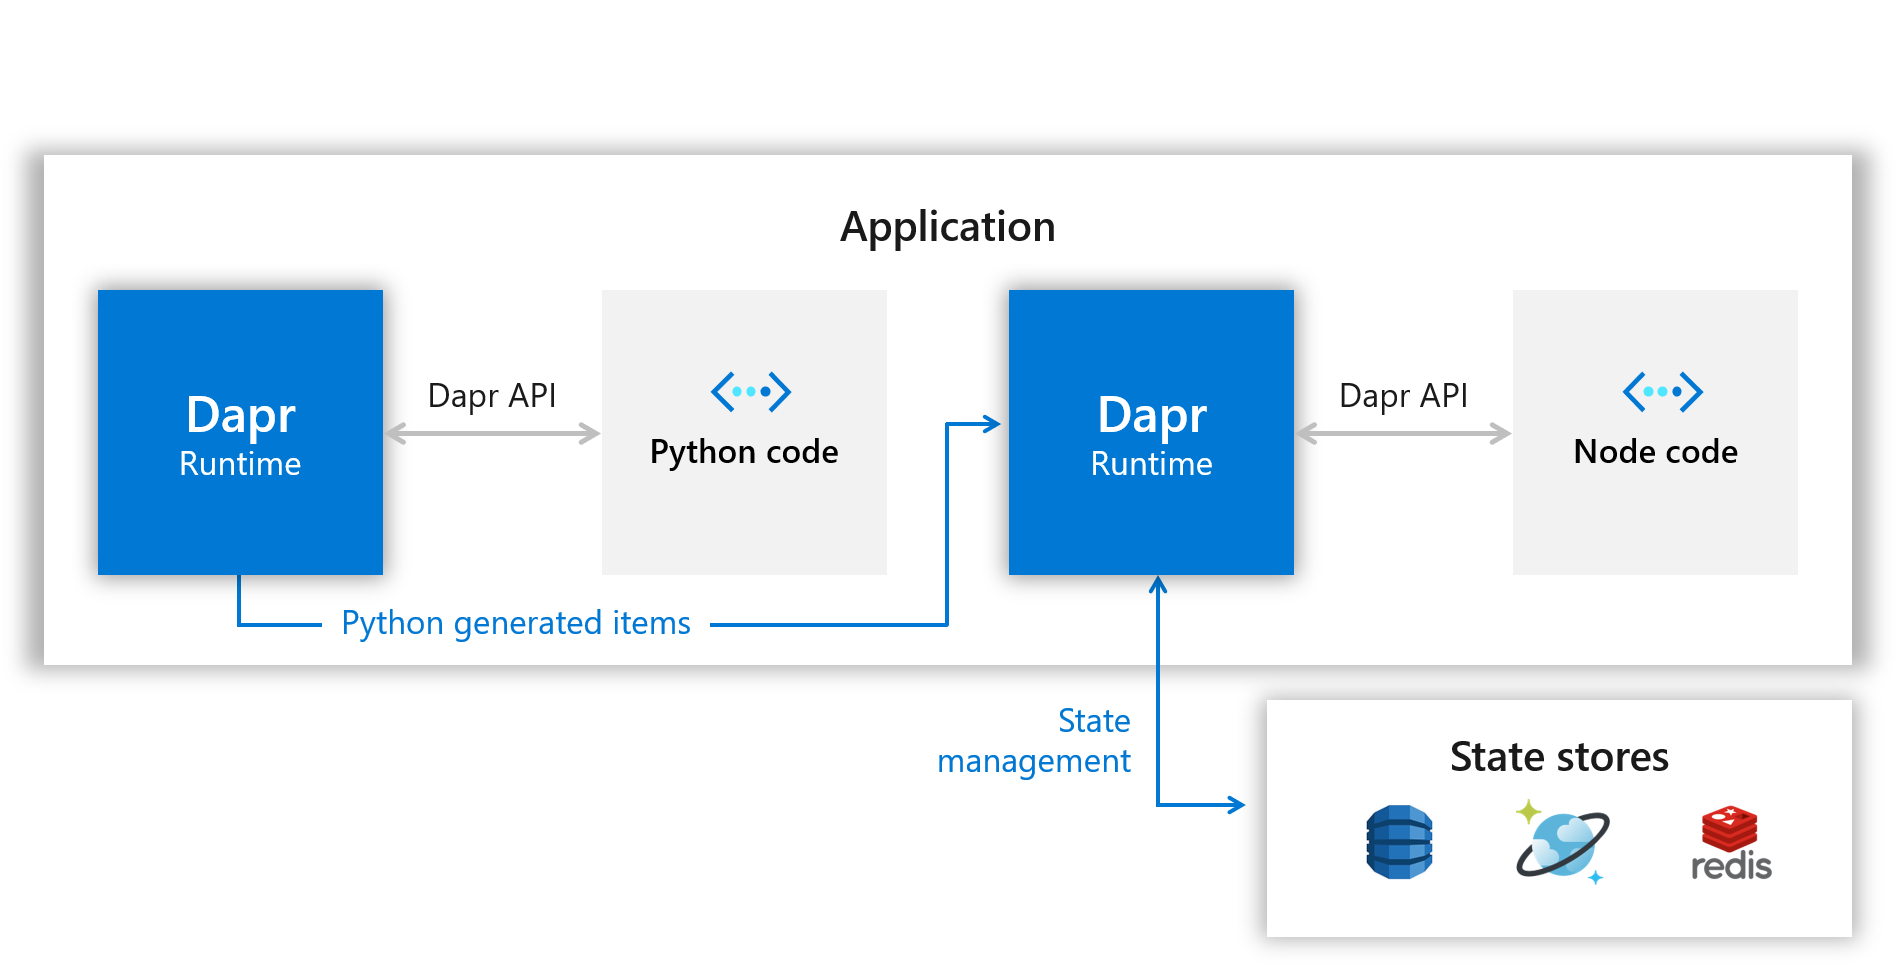
之后,您将部署一个Python应用程序以充当发布者。 下面的架构图显示了新组件的添加:
先决条件
本教程要求您在计算机上安装以下组件:
- Docker
- Node.js version 8 or greater https://nodejs.org/zh-cn/
- Python 3.x: https://www.python.org/downloads/ Note: When running this quickstart on Windows, it best to install Python from python.org rather than from the Windows store.
- Postman https://www.getpostman.com/ [Optional]
第1步 - 设置Dapr
按照上一篇的内容下载并安装Dapr CLI并初始化Dapr。
第2步 - 了解代码
克隆代码到本地,并进入hello-world文件夹:
git clone --depth=1 https://github.com/dapr/quickstarts.git
cd quickstarts/hello-world
npm i
在其中,app.js您将找到一个简单的express应用程序,其中公开了一些路由和处理程序。
首先,看一下文件的顶部:
const daprPort = process.env.DAPR_HTTP_PORT || 3500;
const stateStoreName = `statestore`;
const stateUrl = `http://localhost:${daprPort}/v1.0/state/${stateStoreName}`;
Dapr CLI 默认为 Dapr 创建了一个端口 3500。
接下来,看一下neworder处理程序:
app.post('/neworder', (req, res) => {
    const data = req.body.data;
    const orderId = data.orderId;
    console.log("Got a new order! Order ID: " + orderId);

    const state = [{
        key: "order",
        value: data
    }];

    fetch(stateUrl, {
        method: "POST",
        body: JSON.stringify(state),
        headers: {
            "Content-Type": "application/json"
        }
    }).then((response) => {
        if (!response.ok) {
            throw "Failed to persist state.";
        }

        console.log("Successfully persisted state.");
        res.status(200).send();
    }).catch((error) => {
        console.log(error);
        res.status(500).send({message: error});
    });
});
这个接口,首先记录了传入的数据,然后将 订单ID 持久化到Redis中。
另外一个接口:
app.get('/order', (_req, res) => {
    fetch(`${stateUrl}/order`)
        .then((response) => {
            if (!response.ok) {
                throw "Could not get state.";
            }

            return response.text();
        }).then((orders) => {
            res.send(orders);
        }).catch((error) => {
            console.log(error);
            res.status(500).send({message: error});
        });
});
这将调用edis缓存,以获得order的最新值,从而有效地使Node应用成为无状态应用。
第3步 - 使用Dapr运行Node.js应用
命令如下:
dapr run --app-id nodeapp --app-port 3000 --dapr-http-port 3500 node app.js
输出结果:
Starting Dapr with id nodeapp. HTTP Port: 3500. gRPC Port: 54032
== APP == Node App listening on port 3000!
…………
Updating metadata for app command: node app.js
You're up and running! Both Dapr and your app logs will appear here.
注意:
--app-port是可配置的,是可选的,如果未提供,则使用随机可用端口。
dapr run 命令将查找目录~/.dapr/components,Dapr在运行时使用的组件定义文件,都在这里。
我们看一下 statestore.yaml 的内容:
apiVersion: dapr.io/v1alpha1
kind: Component
metadata:
  name: statestore
spec:
  type: state.redis
  metadata:
  - name: redisHost
    value: localhost:6379
  - name: redisPassword
    value: ""
  - name: actorStateStore
    value: "true"
您可以看到yaml文件将状态存储定义为Redis,并将其命名statestore。这就是app.js中调用状态存储所使用的名称。
const stateStoreName = `statestore`;
const stateUrl = `http://localhost:${daprPort}/v1.0/state/${stateStoreName}`;
第4步 - 将消息发送到服务
现在,Dapr和Node.js应用程序正在运行,您可以使用不同的工具,对它发送POST消息。
- 命令行
dapr invoke --app-id nodeapp --method neworder --data "{\"data\": { \"orderId\": \"42\" } }"
- curl
curl -XPOST -d @sample.json -H "Content-Type:application/json" http://localhost:3500/v1.0/invoke/nodeapp/method/neworder
- Postman
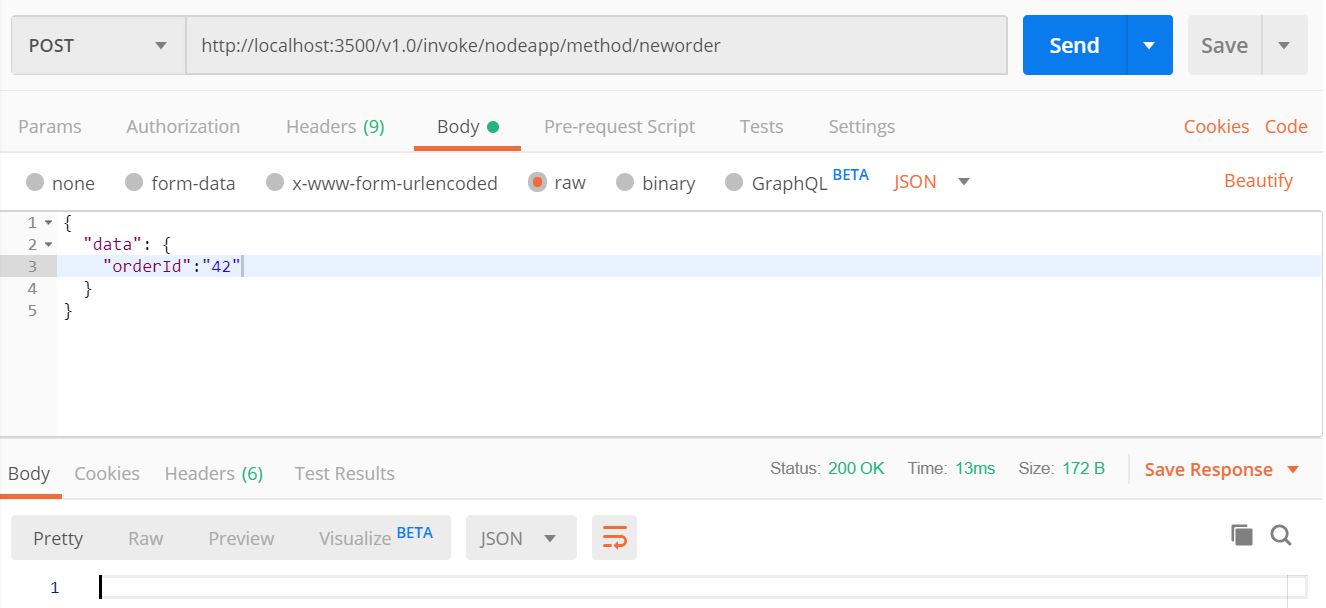
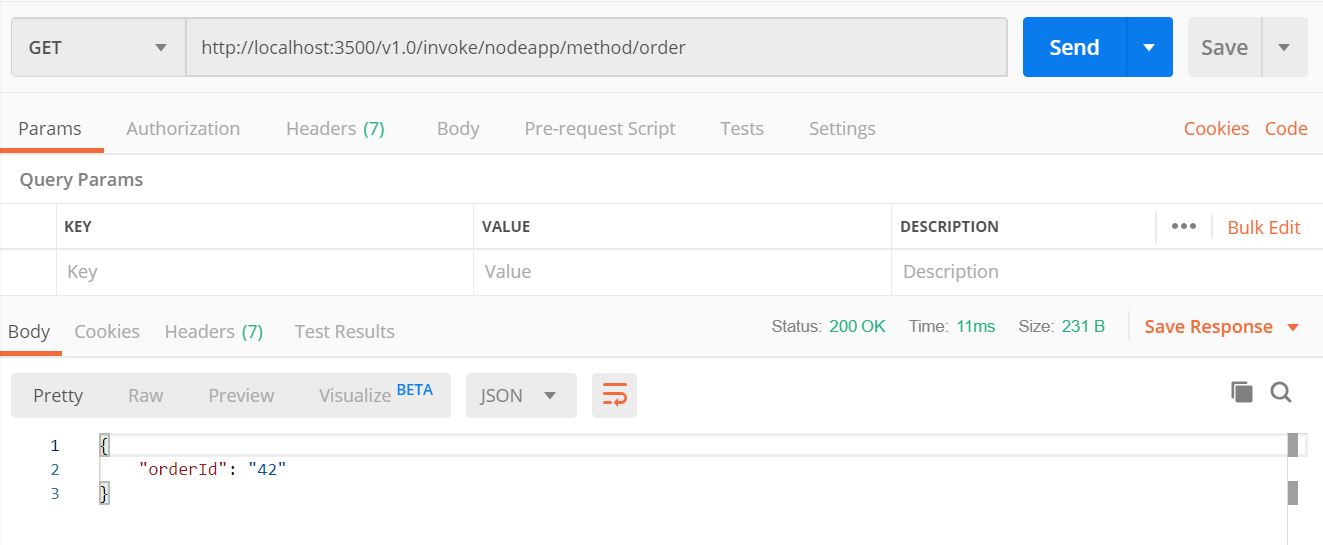
第5步 - 确认成功的持久性
现在,要验证订单是否已成功保存到状态存储中,可以创建一个 GET 请求: http://localhost:3500/v1.0/invoke/nodeapp/method/neworder
- 命令行
dapr invoke --app-id nodeapp --method order --verb GET
- curl
curl http://localhost:3500/v1.0/invoke/nodeapp/method/order
- Postman
第6步 - 使用 Dapr 运行 Python 应用程序
通过这个 Python 应用程序,可以了解另一个应用程序,在不知道目标主机名或端口的情况下,如何通过 Dapr 调用节点应用程序。
在app.py文件中,您可以找到端点定义。
dapr_port = os.getenv("DAPR_HTTP_PORT", 3500)
dapr_url = "http://localhost:{}/v1.0/invoke/nodeapp/method/neworder".format(dapr_port)
Node应用程序的名字(nodeapp)在上面的url中,这一点很重要,这将允许 Dapr 将请求重定向到正确的 API 端点。 这个名字要跟上面练习中的名字一样。
下面的代码将每秒新增一个订单
n = 0
while True:
    n += 1
    message = {"data": {"orderId": n}}

    try:
        response = requests.post(dapr_url, json=message)
    except Exception as e:
        print(e)

    time.sleep(1)
接下来我们将运行这个Python程序
pip3 install requests

dapr run --app-id pythonapp python3 app.py

== APP == Got a new order! Order ID: 1
== APP == Successfully persisted state.
== APP == Got a new order! Order ID: 2
== APP == Successfully persisted state.
== APP == Got a new order! Order ID: 3
== APP == Successfully persisted state.
……………………
现在,执行几次 GET 请求并查看 orderId 每秒如何变化:
curl http://localhost:3500/v1.0/invoke/nodeapp/method/order

{"orderId":76}
第7步 - 清理
dapr stop --app-id nodeapp
dapr stop --app-id pythonapp
运行 dapr list 查看服务已停止运行。
Next steps
Now that you've gotten Dapr running locally on your machine, consider these next steps:
- Explore additional quickstarts such as pub-sub, bindings or the distributed calculator app.
- Run this hello world application in Kubernetes via the Hello Kubernetes quickstart.
- Learn more about Dapr in the Dapr overview documentation.
- Explore Dapr concepts such as building blocks and components in the Dapr documentation.